Description
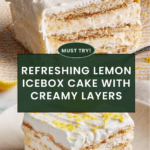
This refreshing Lemon Icebox Cake is a no-bake dessert featuring layers of tangy lemon curd, creamy whipped cream and cream cheese mixture, and crisp Nilla wafers. It is chilled in the freezer to set, making it a perfect light and tangy treat during warm weather. Topped with easy homemade candied lemon peel, this cake combines sweet, creamy, and citrus flavors in every bite.
Ingredients
Scale
Cream Cheese Mixture
- 6 oz. cream cheese, softened to room temperature
- 1/2 cup powdered sugar
- 2 1/2 cups heavy cream
- Zest of two lemons
Layers
- 1 (11-oz.) box Nilla wafers
- 1 cup lemon curd, store-bought or homemade
Candied Lemon Peel
- 1 lemon
- 1/4 cup simple syrup
Instructions
- Prepare the Cream Cheese Mixture: In the bowl of a stand mixer or a large bowl using a hand mixer, cream together the softened cream cheese and powdered sugar on medium speed until smooth, about 2 minutes. Gradually add the heavy cream and continue mixing on medium speed until medium peaks form, roughly 3 minutes. Gently fold in the lemon zest to infuse citrus flavor.
- Assemble the Cake Layers: Spread 1 to 2 tablespoons of the cream cheese mixture evenly over the bottom of a 9″x13″ dish to prevent the cookies from sliding. Arrange a single layer of Nilla wafers over the cream. Spread approximately one-third of the cream cheese mixture over the wafers using an offset spatula or back of a spoon to create an even layer. Drizzle around half of the lemon curd over this cream layer and lightly swirl to combine. Repeat the layering with another layer of cookies, then cream mixture, and finish with the last layer of cream cheese mixture on top. Cover the dish with plastic wrap.
- Freeze the Cake: Place the assembled cake in the freezer for at least 3 hours to allow the layers to set and meld together, giving the wafers a soft, cake-like texture.
- Prepare the Candied Lemon Peel: While the cake is freezing, use a vegetable peeler to slice long strips of lemon peel, careful to avoid the bitter white pith. Slice these strips into very thin pieces and soak them in 1/4 cup simple syrup. Let them candy for at least 3 hours, or you can refrigerate and soak for up to a week.
- Garnish and Serve: Remove the cake from the freezer and garnish the top with the prepared candied lemon peel for a bright and decorative finishing touch. Store any leftover cake in the freezer for up to 7 days.
Notes
- For best results, ensure cream cheese is fully softened before mixing to avoid lumps.
- If you do not have store-bought lemon curd, you can substitute with homemade lemon curd.
- Do not skip the initial layer of cream cheese mixture on the bottom; it helps stabilize the cookies.
- The cake is best served chilled, straight from the freezer but allow it to sit for 5 minutes before slicing for easier cutting.
- Candied lemon peel can be stored in the refrigerator in simple syrup for up to a week, making it easy to prepare ahead.
- This dessert contains dairy; for lactose-intolerant substitutions, use lactose-free cream and cream cheese alternatives.
- Prep Time: 15 minutes
- Cook Time: 0 minutes
- Category: Dessert
- Method: No-Cook
- Cuisine: American
Keywords: Lemon icebox cake, no-bake dessert, lemon curd dessert, Nilla wafer cake, candied lemon peel, summer dessert