
Cream Cheese-Stuffed Red Velvet Cookies Recipe
Introduction
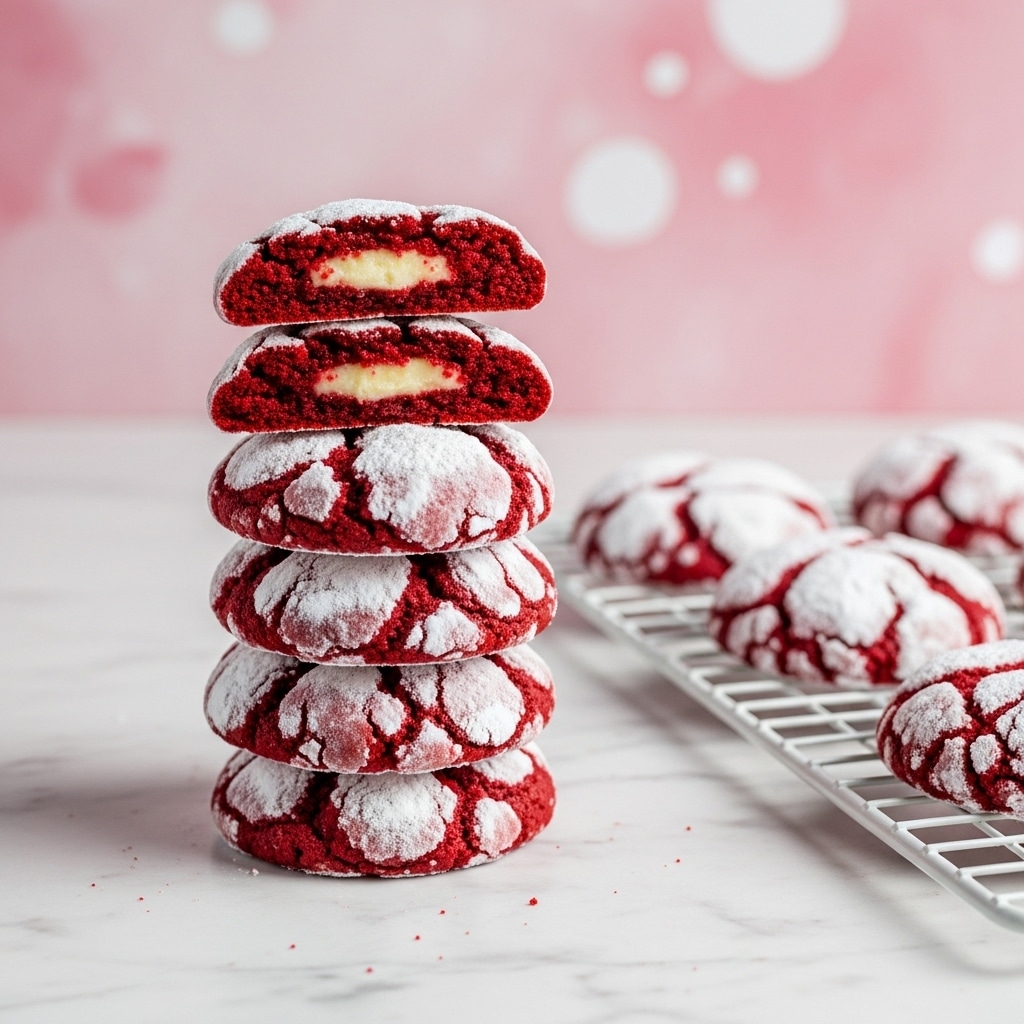
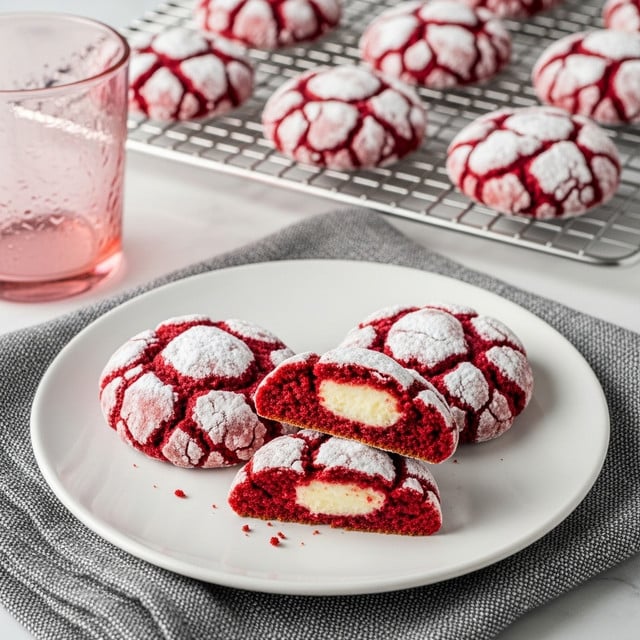
These Cream Cheese-Stuffed Red Velvet Cookies combine the rich, chocolaty flavor of red velvet with a creamy, tangy cream cheese center. Soft, tender, and coated in sugar, they make an irresistible treat perfect for any occasion.
Ingredients
- one 8-ounce package (227g) cream cheese, softened
- 2/3 cup (75g) confectioners’ sugar
- 2 tablespoons (15g) King Arthur Unbleached All-Purpose Flour or King Arthur Gluten-Free Measure for Measure Flour
- 1/2 teaspoon King Arthur Pure Vanilla Extract (for filling)
- 1/8 teaspoon table salt (for filling)
- 2 cups (240g) King Arthur Unbleached All-Purpose Flour or King Arthur Gluten-Free Measure for Measure Flour
- 1/3 cup (28g) King Arthur Triple Cocoa Blend*
- 1 1/2 teaspoons baking powder
- 1/2 teaspoon table salt
- 1 1/3 cup (266g) granulated sugar
- 8 tablespoons (113g) unsalted butter, softened
- 2 large eggs, at room temperature
- 1 teaspoon King Arthur Pure Vanilla Extract (for dough)
- 1 teaspoon gel red food color
- 1/2 cup (99g) granulated sugar (for coating)
- 1/2 cup (57g) confectioners’ sugar (for coating)
Instructions
- Step 1: Line a baking sheet with parchment paper.
- Step 2: Prepare the cream cheese filling by combining the softened cream cheese, 2/3 cup confectioners’ sugar, 2 tablespoons flour, 1/2 teaspoon vanilla extract, and 1/8 teaspoon salt in a large bowl or stand mixer fitted with a flat beater. Mix on medium-high speed until smooth, about 2 minutes, scraping the bowl as needed.
- Step 3: Use a rounded tablespoon cookie scoop to portion 16 mounds (about 17g each) of the filling onto the prepared baking sheet. Freeze uncovered for at least 2 hours or up to one week. For longer storage, transfer frozen mounds to a zip-top bag after 2 hours.
- Step 4: While the filling freezes, sift together 2 cups flour, cocoa powder, baking powder, and 1/2 teaspoon salt in a medium bowl; set aside.
- Step 5: Beat 1 1/3 cups granulated sugar and softened butter in a large bowl or stand mixer at medium speed until fluffy, about 1 minute.
- Step 6: Add eggs one at a time, beating well after each addition and scraping the bowl. Mix in 1 teaspoon vanilla extract and gel red food color until combined.
- Step 7: Add the dry ingredients and mix on low speed until just incorporated, scraping the bowl as needed, less than 1 minute.
- Step 8: Cover and refrigerate the dough for at least 30 minutes or up to 1 day.
- Step 9: Preheat the oven to 350°F with a rack in the center. Line two baking sheets with parchment.
- Step 10: Place remaining granulated sugar and confectioners’ sugar into two separate bowls for coating.
- Step 11: Use a rounded jumbo cookie scoop to portion 16 mounds (about 47g each) of cookie dough onto one of the baking sheets. Remove frozen filling mounds from the freezer.
- Step 12: Working quickly, press a well in the center of one dough portion using your thumb. Place a frozen cream cheese mound into the well and pinch the dough to enclose the filling completely. Roll into a ball. Repeat with 7 more dough portions and filling.
- Step 13: Coat each filled dough ball first in granulated sugar, then in confectioners’ sugar. Transfer to the other prepared baking sheet.
- Step 14: Bake cookies for 16 to 18 minutes until cracked and dry around the edges. Tops will be shiny and moist but should not stick to a light touch. Cool on the baking sheet until set, then transfer to a wire rack to cool fully.
- Step 15: While the first batch bakes, prepare and coat the remaining cookies, then bake them once the first batch finishes.
- Step 16: Serve cookies at room temperature and enjoy!
Tips & Variations
- If dough or filling softens too much while assembling, chill the dough and freeze the filling for 20 minutes before continuing to work more easily.
- Use gel food coloring for vibrant red without thinning the dough.
- For a gluten-free option, substitute all-purpose flour with a measure-for-measure gluten-free flour blend.
Storage
Store leftover cream cheese-stuffed red velvet cookies in an airtight container at room temperature for up to 2 days. To keep them soft, avoid refrigeration. Reheat gently in a microwave for 10-15 seconds if desired, but they’re best enjoyed fresh.
How to Serve
Serve this delicious recipe with your favorite sides.
FAQs
Can I make the cookies ahead of time?
Yes, you can prepare and freeze the cream cheese filling mounds up to one week in advance. The dough can also be refrigerated for up to one day before assembling and baking.
Why do these cookies crack on top?
The cracks are a signature look for these red velvet cookies and indicate that the dough has risen and baked properly. The shiny, moist tops with cracks mean the cookies are soft and tender inside with a slightly crisp edge.
Print
Cream Cheese-Stuffed Red Velvet Cookies Recipe
- Total Time: 2 hours 56 minutes (including freezing and chilling times)
- Yield: 16 large cookies 1x
Description
Delight in these Cream Cheese-Stuffed Red Velvet Cookies, featuring a soft red velvet cookie exterior with a luscious, creamy cream cheese filling inside. Rolled in sugar for a sweet, crackled finish, these cookies combine classic red velvet flavors with a rich, tangy surprise center, perfect for festive occasions or indulgent everyday treats.
Ingredients
Cream Cheese Filling
- one 8-ounce package (227g) cream cheese, softened
- 2/3 cup (75g) confectioners’ sugar
- 2 tablespoons (15g) King Arthur Unbleached All-Purpose Flour or King Arthur Gluten-Free Measure for Measure Flour
- 1/2 teaspoon King Arthur Pure Vanilla Extract
- 1/8 teaspoon table salt
Red Velvet Cookie Dough
- 2 cups (240g) King Arthur Unbleached All-Purpose Flour or King Arthur Gluten-Free Measure for Measure Flour
- 1/3 cup (28g) King Arthur Triple Cocoa Blend
- 1 1/2 teaspoons baking powder
- 1/2 teaspoon table salt
- 1 1/3 cup (266g) granulated sugar
- 8 tablespoons (113g) unsalted butter, softened
- 2 large eggs, at room temperature
- 1 teaspoon King Arthur Pure Vanilla Extract
- 1 teaspoon gel red food color
Coating
- 1/2 cup (99g) granulated sugar
- 1/2 cup (57g) confectioners’ sugar
Instructions
- Prepare the baking sheet: Line a baking sheet with parchment paper to prevent sticking and facilitate easy removal of the cream cheese filling mounds.
- Make the cream cheese filling: In a large bowl or a stand mixer fitted with the flat beater, combine softened cream cheese, confectioners’ sugar, flour, vanilla extract, and salt. Mix on medium-high speed for about 2 minutes until smooth, scraping down the bowl to ensure even incorporation.
- Portion and freeze filling: Using a rounded tablespoon cookie scoop, portion out 16 mounds (approximately 17g each) of the cream cheese filling onto the prepared baking sheet. Freeze uncovered for at least 2 hours or up to one week. For longer storage, transfer frozen mounds to a zip-top bag after 2 hours.
- Sift dry ingredients for dough: While the filling freezes, sift together the flour, cocoa powder, baking powder, and salt in a medium bowl. Set this mixture aside.
- Cream butter and sugar: In a large bowl or stand mixer, beat granulated sugar and softened butter on medium speed for about 1 minute until light and fluffy.
- Add eggs and flavors: Beat in the eggs one at a time, scraping the bowl between additions to ensure thorough mixing. Add vanilla extract and red gel food coloring, mixing until fully combined. Scrape the bowl again.
- Combine dry ingredients with wet: Gradually add the sifted dry ingredients to the wet mixture, beating on low speed until just combined and no dry flour remains. Scrape the bowl as needed, mixing less than 1 minute in total to avoid overmixing.
- Chill dough: Cover the dough and refrigerate for at least 30 minutes, or up to 1 day ahead to firm up.
- Preheat oven: Set your oven to 350°F (175°C) and position a rack in the center. Line two baking sheets with parchment paper.
- Prepare coating sugars: Put the remaining granulated sugar and confectioners’ sugar into two separate shallow bowls for coating the cookie dough.
- Portion dough: Using a rounded jumbo cookie scoop, form 16 mounds of dough (approximately 47g each) on one of the prepared baking sheets. Retrieve the frozen cream cheese filling mounds from the freezer.
- Stuff cookies: Working quickly, press a well in the center of each dough mound using your thumb. Place a frozen cream cheese filling mound into the well, then pinch the dough around it to fully encase the filling. Roll gently between hands to form smooth balls. If dough or filling softens too much, chill dough and freeze filling briefly before continuing.
- Coat dough balls: Roll each filled dough ball first in granulated sugar, then in confectioners’ sugar, coating completely. Place coated cookies spaced on the prepared baking sheet.
- Bake first batch: Bake cookies for 16 to 18 minutes until cracked on the surface and dry at the edges. The tops should still appear shiny and moist but not sticky to light touch. Allow to cool on the baking sheet until set before transferring to a wire rack to cool completely.
- Prepare remaining cookies: While the first batch bakes, repeat the stuffing and coating process with remaining dough and filling.
- Bake the second batch: Once the first batch finishes baking, bake the second batch following the same time and visual cues.
- Serve and store: Serve cookies at room temperature. Store any leftovers in an airtight container at room temperature for up to 2 days to maintain freshness.
Notes
- If dough or filling becomes too soft while assembling, chill dough and freeze filling for 20 minutes before continuing for easier handling.
- The cookies have a shiny, moist top when done but should not stick to the touch, indicating perfect doneness for a soft center and firm edges.
- You can freeze the cream cheese filling mounds up to a week ahead for convenience.
- Using gel food coloring provides vibrant red color without affecting dough moisture.
- Adjust baking time slightly if using gluten-free flour to avoid overbaking.
- Store cookies in an airtight container at room temperature to keep filling creamy and cookie texture soft.
- Prep Time: 20 minutes
- Cook Time: 36 minutes (2 batches of 16-18 minutes each)
- Category: Dessert
- Method: Baking
- Cuisine: American
Keywords: red velvet cookies, cream cheese stuffed cookies, holiday cookies, soft cookies, red velvet dessert, cream cheese filling


