Description
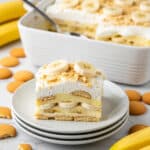
A creamy and delicious no-bake banana pudding dessert featuring layers of instant banana pudding, cream cheese, whipped topping, ripe bananas, and crunchy Nilla Wafers. Ready in minutes and chilled to perfection, this easy-to-make treat is perfect for any occasion.
Ingredients
Scale
For the Cream Cheese Mixture
- 8 ounce block cream cheese, softened to room temperature
For the Pudding
- 5.1 ounces box instant banana pudding (larger box)
- 3 cups whole milk
Other Ingredients
- 8 ounce tub whipped topping, thawed (Cool Whip)
- 11 ounce box Nilla Wafers
- 5 ripe bananas, sliced
Instructions
- Whip the Cream Cheese: In a bowl, add the softened 8-ounce block of cream cheese. Use an electric hand mixer or stand mixer at medium speed to whip until smooth. Scrape down the sides of the bowl as needed. Set aside once creamy.
- Prepare the Instant Pudding: In a separate bowl, combine the 5.1-ounce box of instant banana pudding mix with 3 cups of whole milk. Mix using an electric hand mixer at medium speed or whisk by hand until fully combined and thickened.
- Combine Cream Cheese and Pudding Mixture: Transfer the prepared pudding into the whipped cream cheese bowl. Use a hand mixer on medium speed to blend the two mixtures thoroughly, occasionally scraping the bottom with a rubber spatula to ensure complete blending. Set the combined mixture aside.
- Layer the Base: Line the bottom of a 2.5-quart baking dish (or a 9×9-inch or 11×7-inch dish) evenly with Nilla Wafers, covering the entire bottom surface.
- First Pudding Layer: Spread one-third of the pudding mixture evenly over the Nilla Wafers layer.
- Add Bananas: Layer sliced bananas over the pudding evenly.
- Repeat Layers: Repeat the layers two more times—Nilla Wafers, pudding mixture, then bananas—to build up the dessert.
- Top with Whipped Topping: Spread the 8-ounce tub of thawed whipped topping evenly on the very top layer.
- Chill: Cover the baking dish and refrigerate for at least 1 hour. For softer Nilla Wafers, refrigerate for 2 hours or overnight to allow flavors to meld and wafers to soften fully.
- Optional Topping: Before serving, optionally crush a few Nilla Wafers and sprinkle them over the top for added texture and decoration.
Notes
- Use ripe bananas for the best sweetness and texture.
- Chilling time affects the softness of the Nilla Wafers; longer refrigeration results in softer wafers.
- Can be prepared a day in advance and stored covered in the refrigerator.
- To make slicing easier, use a sharp knife after chilling.
- Variations: Substitute light milk or half-and-half for fewer calories, or use banana-flavored whipped topping for enhanced banana flavor.
- Prep Time: 15 minutes
- Cook Time: 0 minutes
- Category: Dessert
- Method: No-Cook
- Cuisine: American
Keywords: banana pudding, no bake dessert, easy banana dessert, layered pudding, Nilla Wafers, instant pudding dessert, creamy banana pudding